
Landscaping
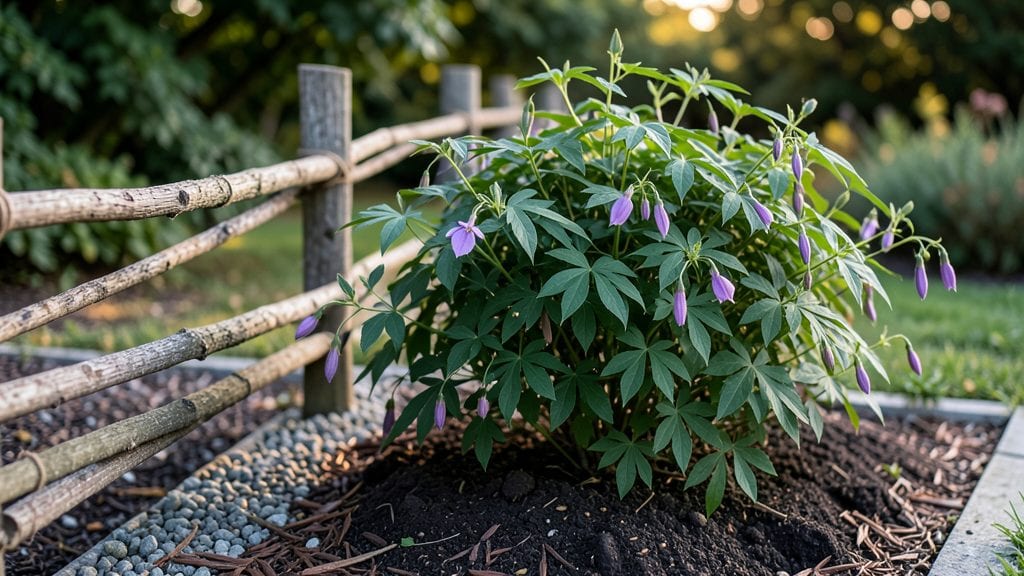
A tree branch fence turns your yard into a private retreat with zero plastic or metal. I built mine last spring using fallen branches from my neighbor’s cleanup pile—no tools, no permits, just raw materials and a little elbow grease.
The result? A living, breathing screen that moves with the wind and blends seamlessly into the landscape.
This isn’t just a fence—it’s a statement. You’ll need branches 4-6 feet long, flexible enough to weave but sturdy enough to stand upright. Twine or wire ties keep them in place, and optional vines or flowers can soften the look over time.
The best part? It costs next to nothing compared to traditional fencing, and every branch tells a story of the land itself.
Imagine stepping into your garden and feeling instantly shielded from the world outside, yet surrounded by nature’s own artistry. The branches filter light beautifully, creating dappled shadows that dance across your patio.
Plus, small wildlife like birds and bees find new habitats—turning your fence into an ecosystem, not just a barrier.
Perfect for cottage gardens, woodland edges, or even as a temporary screen while you plan something more permanent. Here’s how to start—no green thumb required, just curiosity and a willingness to get your hands dirty.
📚 In This Guide
- What you need
- Instructions
- Tips and common mistakes
- Wrapping up and next steps
What you need
- ● Tree branches: 10–20 medium-sized, flexible branches (3–6 feet long, 1–2 inches thick). Look for willow, dogwood, or hazel for durability.
- ● Stakes or posts: 6–10 wooden or metal stakes (4–6 feet tall) to anchor the fence.
- ● Twine or natural rope: 50–100 feet of jute or hemp twine (¼-inch thickness) for weaving.
- ○ Optional: Wooden dowels (for extra support) or a hammer (for driving stakes).
- ● Pruning shears (to trim branches evenly).
- ● Measuring tape (for spacing).
- ● Gloves (to protect hands while handling branches).
- ○ Optional: Staple gun (for securing twine) or a drill (for pre-drilling stakes).
- ● A flat, clear area (6–12 feet wide, depending on fence height).
- ● Sunny or partially shaded spot (branches dry faster in sunlight).
- ● Basic DIY skills (weaving and knot-tying help!).
Step-by-Step instructions for building a tree branch privacy screen
Here's how to create a sturdy, natural fence using fallen branches and simple tools.
Gather and Prepare Your Materials
Collect 4-6 feet long branches with diameters between 2-4 inches—thicker branches create a more substantial barrier. Look for straight, flexible pieces without major knots or splits. I recommend using maple, oak, or willow branches because they hold their shape well and resist rot longer. Cut any small limbs or side branches with pruning shears to create clean, smooth surfaces for weaving.
If you don't have access to fresh branches, dried branches work too, but soak them in water for 24 hours before building to restore flexibility. This prevents them from snapping when you bend them into place. Avoid branches with bark peeling off or signs of insect damage—they won't last as long in your fence.
Create a Sturdy Base Frame
Start by driving 4 wooden posts into the ground at each corner of your fence area, spaced 6-8 feet apart. These posts should be 6 feet tall and buried 1 foot deep for stability. Use a post hole digger to create holes, then fill them with concrete to secure the posts firmly. Let the concrete set for 24 hours before adding branches.
Once the posts are set, attach 2 horizontal support beams across the top and middle of each post using galvanized screws or heavy-duty zip ties. These beams will serve as anchors for your branches. Measure carefully—your fence should stand 5-6 feet tall for adequate privacy. If you're building a taller fence, add a third beam halfway up for extra support.
Weave the Branches Vertically and Horizontally
Begin by inserting the thickest branches vertically between the posts, spacing them 12-18 inches apart. Bend the branches slightly and secure them to the horizontal beams with zip ties or wire. Leave about 6 inches of space between the top of the fence and the ground to allow for natural settling and airflow, which helps prevent rot.
Next, weave thinner branches horizontally between the vertical supports, overlapping them like a lattice. Start at the bottom and work your way up, alternating directions with each row to create a tight, interlocked pattern. This crisscross design adds strength and makes the fence more wind-resistant. If a branch feels too stiff to bend, soak it again for 1-2 hours before trying to shape it.
Secure and Reinforce the Structure
Once all branches are in place, reinforce the corners and any weak spots by wrapping heavy-duty landscape fabric or burlap around the joints. Secure it with zip ties or twine to hold the branches tightly together. This step is especially important if you live in a windy area—loose branches can shift over time and weaken the fence.
Finally, check for any gaps larger than 2 inches and fill them with smaller branches or twigs. A well-woven fence should have no visible holes larger than a fist. If you notice any branches starting to sag after a few weeks, add a few extra zip ties or adjust the tension slightly. The goal is a fence that looks natural but stays sturdy for years.
Finish and Maintain for Longevity
To protect your fence from moisture and pests, apply a natural wood sealant or linseed oil to the branches. This step isn’t mandatory but will extend the life of your fence by 2-3 years, especially if it’s exposed to rain or sun. Avoid using chemical treatments—they can harm the environment and attract pests.
Inspect your fence once a year and replace any branches that show signs of rot, cracks, or insect damage. Prune back any overgrown branches or vines that might climb onto the fence, as they can weigh it down over time. With proper care, a tree branch fence can last 5-10 years, blending seamlessly into your landscape while providing privacy and charm.
Tips & tricks for building a tree branch privacy screen
Building a tree branch fence is all about balance—between strength and natural beauty, between flexibility and rigidity. Here's what I've learned from years of trial and error to help you create a fence that lasts and looks stunning.
Branch Selection Matters: When gathering branches, prioritize ones with a slight natural bend—they'll hold their shape better when woven. Test flexibility by gently bending a branch: if it snaps with minimal pressure, it's not ideal. For the vertical supports, aim for branches between 2-4 inches in diameter, as these provide the best balance of strength and workability. In Step 1, if you're unsure about a branch's quality, do the "snap test" before cutting it down.
Timing Tip for Dried Branches: The 24-hour soaking time in Step 1 is non-negotiable for dried branches, but don't exceed this duration—over-soaking can cause branches to become too soft and prone to mold. For extra-stiff branches that still feel resistant after soaking, try the "steam method": wrap the branch in a damp towel and microwave it for 1-2 minutes. This targeted approach restores flexibility without the risk of over-soaking.
Weaving Technique for Wind Resistance: In Step 3, when weaving horizontally, create a "staggered" pattern by alternating the direction of each row. Start with a horizontal branch at the bottom, then weave the next row in the opposite direction, overlapping by about 2 inches. This interlocking pattern mimics natural wicker and significantly increases wind resistance. For extra stability in windy areas, consider adding a third horizontal beam in Step 2, creating a triangular support system.
Maintenance Shortcut: The annual inspection mentioned in Step 5 doesn't have to be time-consuming. Set a reminder for early spring, when most pests are dormant but before summer heat stresses the branches. During your inspection, focus on the four corners and any branches that show signs of graying or soft spots—these are the most vulnerable areas. Replace only what's necessary, as partial repairs can often extend the life of your fence by another season.
Pro Tips for Tree Branch Fence
- Building a tree branch fence is all about balance—between strength and natural beauty, between flexibility and rigidi...
- Branch Selection Matters: When gathering branches, prioritize ones with a slight natural bend—they'll hold their shap...
- Timing Tip for Dried Branches: The 24-hour soaking time in Step 1 is non-negotiable for dried branches, but don't exc...
Frequently asked questions
Got questions about creating a tree branch fence? You’re not alone! Whether you’re curious about materials, timing, or maintenance, we’ve got the answers to help you build a stunning natural privacy screen with ease. Here are some of the most common FAQs:
What types of trees are best for a tree branch fence?
Choose trees with flexible, sturdy branches—willow, hazel, or dogwood work beautifully! Avoid brittle woods like pine or oak, which may snap under pressure. Pro tip: Look for trees with a natural arch or weeping shape for a softer, more organic look.
How long does it take to build a tree branch fence?
For a small section (10–15 feet), expect 4–8 hours if you’re a beginner. Larger projects or complex designs may take a full weekend. Break it into stages: clearing branches, weaving, and securing them. Patience pays off for a polished finish!
Do I need special tools for a tree branch fence?
Basic tools suffice! You’ll need pruning shears, a mallet, twine or wire, and stakes for support. Optional upgrades: a drill for securing branches, a saw for thicker limbs, or a staple gun for extra hold. Skip the power tools if you’re going for a rustic, low-tech vibe!
Can I use a tree branch fence for year-round privacy?
Freshly built fences offer immediate privacy, but branches may thin over time as they dry. To extend lifespan, reapply twine or wire annually and trim dead growth. For evergreen privacy, pair branches with dense shrubs or vines like ivy.
Is a tree branch fence cheaper than traditional fencing?
Costs vary, but a DIY branch fence typically runs $1–$5 per linear foot (vs. $15–$50+ for wood or vinyl). The trade-off? It’s eco-friendly, biodegradable, and adds natural charm—but requires more upkeep. Budget win!
Wrapping up and next steps
A tree branch fence isn’t just a rustic addition to your yard—it’s a harmonious blend of nature and craftsmanship that enhances privacy while keeping your outdoor space feeling open and serene.
With the right materials and a little creativity, you can transform simple branches into a stunning, low-maintenance feature that complements any landscape.
Ready to bring this natural elegance to your home? Start small—gather a few branches, sketch a design, and take the first step today! Your future self (and your garden) will thank you. 🌿✨